Fig. 1: The pride of the ProFarms Ltd. company: SimCow 1.3
Let us assume that we are an employee of a company named ProFarms Ltd. that has created a Mac OS X application called SimCow 1.3. We would like to deploy our product in a Mac OS X installer package.

First of all, let us create a build folder in which we will do all the work and store all the preliminary files:
~ $ mkdir build && cd build
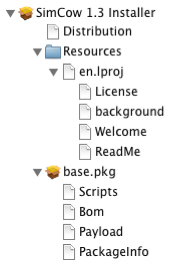
A flat package is basically a xar archive that has a particular structure. In our case the structure of the flat package would look something like this:

Let us mimic this folder structure by creating some directories in the build folder:
~ $ mkdir -p flat/base.pkg flat/Resources/en.lproj
Also, in the build folder, we need to put the pay-load that we wish to install (in our case the SimCow application bundle) into a folder called root. The contents of this folder should be relative to the root file system on Mac OS X, i.e. the root folder contains the Applications folder with the SimCow.app inside. For example, if our SimCow.app is located in our home directory, we would execute the following in the build directory:
~ $ mkdir -p root/Applications; cp -r "~/SimCow 1.3.app" root/Applications/
After all these commands, the folder structure should look something like this:

Now let's add some of the necessary files in the base package. First we will compress the pay-load:
~ $ ( cd root && find . | cpio -o --format odc --owner 0:80 | gzip -c ) > flat/base.pkg/Payload
Notice that we told cpio to override the user and group id. This is very important as your linux user and group ids will most certainly not match with the required user and group root/wheel (0/80) which Mac OS X requires.
Now let us create the PackageInfo file in the base.pkg directory. This is an xml-file containing properties about the installer:
<pkg-info format-version="2" identifier="com.ProFarms.SimCow.base.pkg" version="1.3.0" install-location="/" auth="root">
  <payload installKBytes="264" numberOfFiles="13"/>
  <scripts>
    <postinstall file="./postinstall"/>
  </scripts>
<bundle-version>
    <bundle id="com.ProFarms.SimCow" CFBundleIdentifier="com.ProFarms.SimCow" path="./Applications/SimCow 1.3.app" CFBundleVersion="1.3.0"/>
</bundle-version>
</pkg-info>
There are many important things you must watch out for in this file. First of all, notice how the PackageInfo file lists all bundles that are in your pay load. The version and bundle-ids must match the Info.plist in your application bundle exactly, otherwise the installer will fail. Also, the PackageInfo contains the number of files and the installation size in kb. Both can be obtained by executing the following in the build folder:
      ~ $ find root | wc -l
      ~ $ BLOCKSIZE=1k du -s root
where the latter is the payload size in kilobytes.
If you do not wish to execute an installer script then you can omit the <scripts> section of the above PackageInfo file. However, ProFarms Ltd. has decided to deploy their installer with a postinstall script. To add this to the installer, we first create a script directory (mkdir scripts) in the build folder and then place a file named postinstall inside that folder with the following contents:
      #!/bin/bash


      osascript -e 'tell app "Finder" to display dialog "To get the most of SimCow please also install SimMilkMachine."'
Mark the script as executable
~ $ chmod +x scripts/postinstall
and compress the scripts folder with the following command:
~ $ ( cd scripts && find . | cpio -o --format odc --owner 0:80 | gzip -c ) > flat/base.pkg/Scripts
The last file needed in the base package is the Bom file. For this you will need to install the bomutils. Create the Bom with the following command:
~ $ mkbom -u 0 -g 80 root flat/base.pkg/Bom
In the above command, note that we are once again overriding the user and group identifiers. As mentioned above, on Mac OS X the user and group id must be 0/80. The -u and -g options allow us to conveniently set these values.
Great! We are done with the base.pkg, however there are still a few more files left in the flat package directory - all are very straight-forward.
First, create the Distribution file. Place the following contents into the flat folder:
<?xml version="1.0" encoding="utf-8"?>
<installer-script minSpecVersion="1.000000" authoringTool="com.apple.PackageMaker" authoringToolVersion="3.0.3" authoringToolBuild="174">
    <title>SimCow 1.3</title>
    <options customize="never" allow-external-scripts="no"/>
    <domains enable_anywhere="true"/>
    <installation-check script="pm_install_check();"/>
    <script>function pm_install_check() {
  if(!(system.compareVersions(system.version.ProductVersion,'10.5') >= 0)) {
    my.result.title = 'Failure';
    my.result.message = 'You need at least Mac OS X 10.5 to install SimCow.';
    my.result.type = 'Fatal';
    return false;
  }
  return true;
}
</script>
    <choices-outline>
        <line choice="choice1"/>
    </choices-outline>
    <choice id="choice1" title="base">
        <pkg-ref id="com.ProFarms.SimCow.base.pkg"/>
    </choice>
    <pkg-ref id="com.ProFarms.SimCow.base.pkg" installKBytes="264" version="1.3.0" auth="Root">#base.pkg</pkg-ref>
</installer-script>
Most of the items should not need a lot of explaining. We've included a system version check in the Distribution javascript. Note also, that the pkg-ref id and the installKBytes must match the PackageInfo file which we generated above.
Optional: If you would like to add a license text, a ReadMe file, a welcome text and an installer background image. Then also add the following to your Distribution file, right after the closing </script> tag:
      ...
      </script>
    <background file="background" alignment="left" scaling="none"/>
    <welcome file="Welcome"/>
    <readme file="ReadMe"/>
    <license file="License"/>
    <choices-outline>
        <line choice="choice1"/>
...
You will also need to create the License, Welcome, ReadMe and background files in the flat/Resources/en.lproj folder. The text files need to be in .rtf format (for example use AbiWord). The background image file is a .png file.
Now the only thing that needs to be done is to zip everything up into a xar archive. Normally, xar does not come pre-installed in linux distributions. It can either be installed with your distro's package manager or obtained from here. Now type-in the following command to create your flat package installer:
~ $ ( cd flat && xar --compression none -cf "../SimCow 1.3 Installer.pkg" * )
Note, that you must not compress the flat package installer. The PayLoad has already been compressed and compressing the flat package again will create a broken installer.
That's it. You now have a Mac OS X installer package!
Optional: Some people like to put the installer onto a disk image. This can also be done within linux with the following command:
  ~ $  mkdir /tmp/disk
  ~ $  cp "SimCow 1.3 Installer.pkg" /tmp/disk/
  ~ $  mkisofs -o SimCow.img  -r -l -ldots -V "Sim Cow 1.3" /tmp/disk
Hosted on GitHub Pages — Theme by orderedlist